


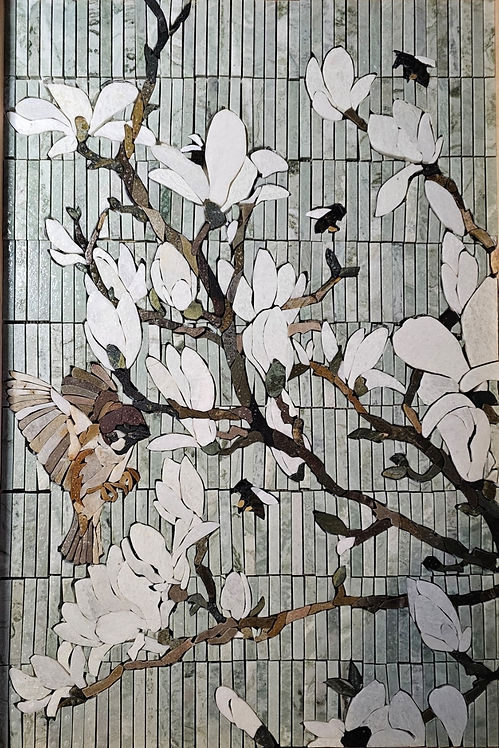
150 Hours
This piece was the ultimate labor of both love and hate.
Inspiration is like a roller coaster. The creativity flows on the way down and the climb back up is jam packed full of 'what-am-I-doing' moments and sometimes thoughtful deliberation.

It Starts With An Idea
I've always been an admirer of nature. Plants and animals living and adapting to society taking everything over. It's nice to see birds landing at my feeders, and it's even more pleasant to see an ecosystem flourishing.
For this piece I knew I wanted to create something vibrant and dramatic, yet soft and whimsical as well.
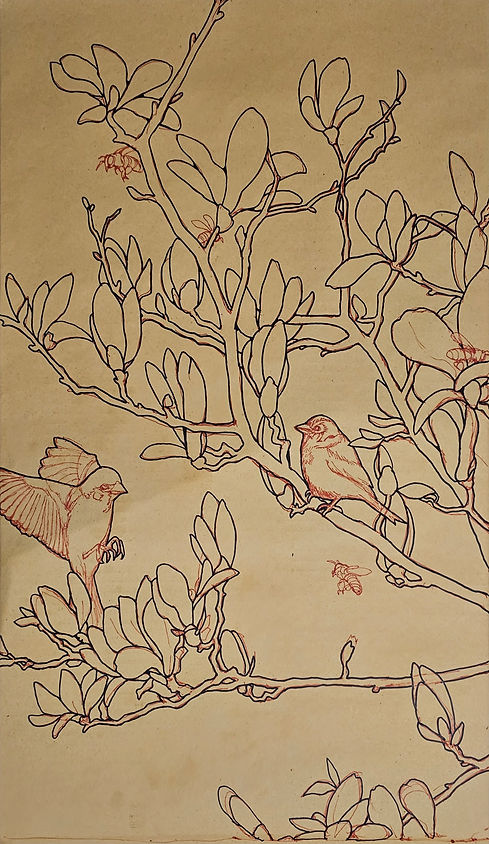
I initially drew out roughly what I envisioned in red sharpie, allowing myself to be a little more liberal with the details, but generally focus on the form and movement.
Once I had the general idea down, I outlined the major shapes in black. This helped me to visualize exactly how small I could go with the mosaic pieces, and also helped me to prioritize areas that might end up looking too congested.

Color Theory
Has to be the right colors. Has to have the right amount of contrast between the petals and the branches.
The branches can't be too dark, but the lighter colors will appear to add shading/highlights, which will create a unique effect on the overall image I think.
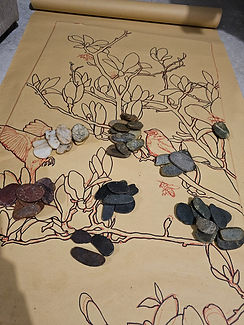


Templating
Time to commit to the process.
I used some dollar store transparent grid tape for transferring the initial design. Meticulously applying each transfer onto the stone so as to best capture the differences between the petals.


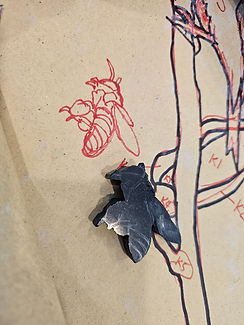
Losing Steam


RIP Blobert
Sometimes things just don't quite turn out the way you hoped. While you could still make out the 'sparrow' shape, the details became too abstract and Blobert had to be omitted.


Background Check
Played around with a couple different ideas for color/texture in the background. I settled on trying to find something mid range so the blossoms would stand out just as much as they wouldn't get lost in a too similar colored background.


I have a thing for gold okay?
Call it my inner goddess or whatever but gold just looks super good! I almost caved and went with it, but ultimately I didn't want the background to be that loud.


Don't Lose Track!
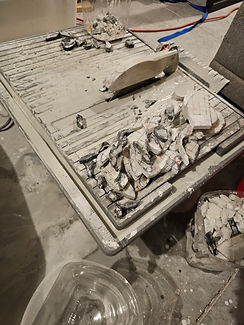
You'd think cutting the backround out would have been a cake walk...It's easy enough to toss the X and keep the other half...
Just trying to remember where the cut pieces should return after cutting, made me realize I needed to inlay the background with the foreground as I was cutting...


BEES!
So I think I could accomplish with pretty decent accuracy the shape of the bee on my wet saw. It definitley didnt support keeping the antennae or legs intact, so next time I'll have to get it close and try to dremel the finer details.


Did I mention I liked gold?
Just a small amount!! Look how cool they look now. They aren't perfect, but I can put more effort in next time!


Ready for Installation!
Little did I know...my lesson had not be learned...
I ended up hand-setting every single piece to ensure I could get them as straight as possible...
And they still ended up crooked...


Building a Frame
I only vaguely know what I'm doing here... :)
Cut lumber, make 45 degree cuts, measure 3x and cut 2x. Slap some wood glue, pop in come finishing nails, use the clamps!
I ended up gluing the mounting bracket on the bottom...so definitely make sure you mark which side is up...


Staining the Frame?
I thought I would paint it at first, but settled on a nice wood stain instead. Then I grouted and decided to add the little decorate metal corners which I really love!
I also like that it really does have that more hand-crafted feel with not everything being so perfect. It lends a certain charm and doesn't feel like it's been manufactured.


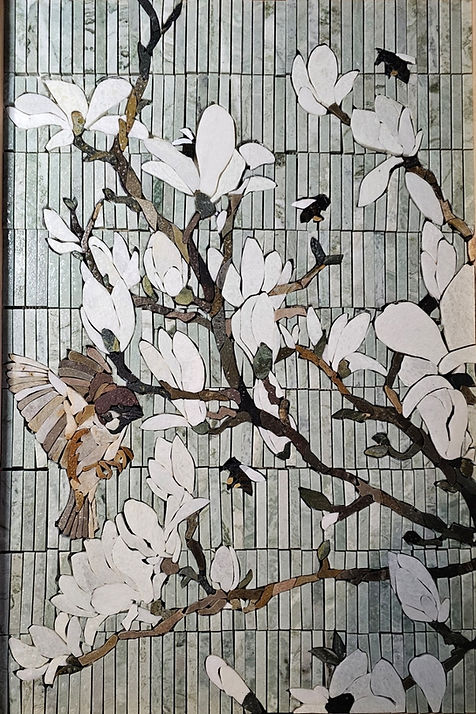
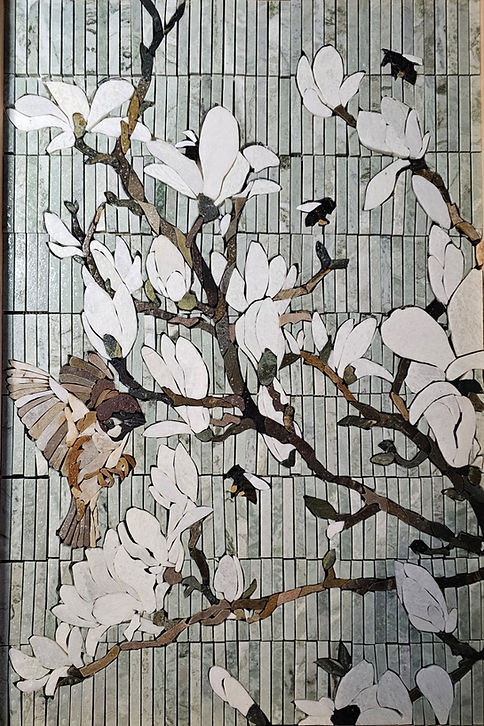
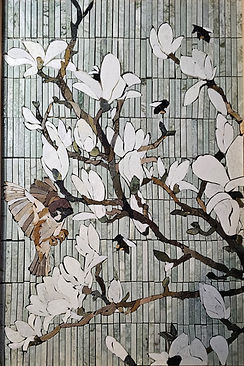
All done!
Only 2.5 years in the making!
Hanging it up makes me nervous...I went a little overboard on the drywall anchors though...
Now to find it's next home!
![20250616_160900[1].jpg](https://static.wixstatic.com/media/9fb664_d0acdb036f7a474b910e76656eb8a554~mv2.jpg/v1/fill/w_489,h_652,al_c,q_80,usm_0.66_1.00_0.01,enc_avif,quality_auto/9fb664_d0acdb036f7a474b910e76656eb8a554~mv2.jpg)